Breaking News
Main Menu
Windows Server 2003 Standard Bootable Iso On Usb
вторник 13 ноября admin 7
• Windows XP (SP2) (not Windows XP x64) • Windows Server 2003 R2 • Windows Vista • Windows 7 • Windows 8 and Windows 8.1 • Windows 10 • Hiren’s Boot CD • NT Password Registry Editor • Ultimate Boot CD • GParted • Partition Magic • Debian •.plus many more In this tutorial we will be creating a bootable Windows 7 Ultimate x64 USB. Things you will need: • Your bootable ISO of choice.
I will be using a Windows 7 Ultimate x64 ISO (If you have a Windows 7 disk, then you can easily using ImgBurn) • Latest version of (I am using version 2.2) • A spare USB stick (The size of the USB required will vary depending on the size of the ISO you are using. For this exercise I need an 8GB USB) Once you have the required items, you can start by opening up Rufus.
1) Set up 2003 to install from a bootable USB stick 2) Move the physical CD drive from the server to whatever computer you use to burn CDs and burn a new one with that drive 3) Move the CD drive that wrote the CD to the server. Insert the Windows 2003 CD-ROM that you want to integrate with SP1. Open IsoBuster and select Bootable CD from the left pane, right-click the Microsoft Corporation.img file, and select Extract Microsoft Corporation.img from the context menu, as the figure shows.
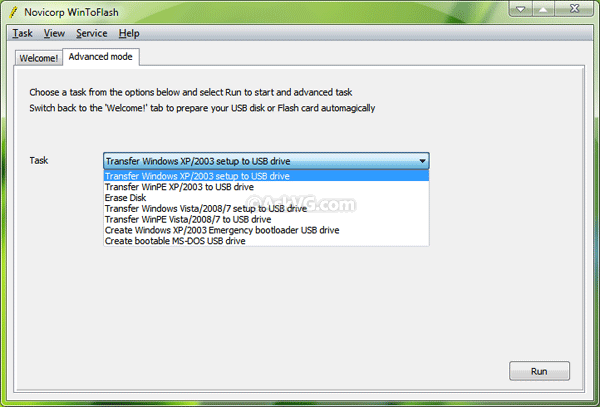
Don’t worry about any of the settings here as Rufus will automatically do this for you depending on the type of ISO you are using. By default, it will appear to have many of the options blank until you connect your USB. Once you connect the USB, these fields will be automatically filled for you. Next, connect your USB to your computer. Now we need to select our ISO. (in my case the Windows 7 ISO) Select the icon highlighted as shown below, which will let you browse for the required ISO file.
Select the file by left clicking on it once and then clicking on Open. Rufus will now have filled out the fields for you. All you have to do now is hit Start. Note, if you are using a USB stick that is too small, like using a 4GB USB for an ISO that is larger than 4GB you will get the following error: If your USB is the correct size then you will get a standard warning telling you that any data/partitions that was on the USB before starting the process will be permanently deleted Click OK, to start. How long the process will take to complete will depend on the specs of your computer, the USB (read/write speeds) and the size of the ISO you are using. You now have a bootable USB.
Producing a bootable CD is a relatively straightforward process. You need a program to pull the boot image file from your regular Windows Server 2003 CD and a CD drive capable of writing to CDs.
And, of course, you need an installed program to create the CD. I used to pull the boot image file from the CD. ISO Buster is a part freeware and part shareware data recovery tool. You can use the freeware capabilities to do what we need to do here, but you will probably want to go make a donation or register it once you see all that it can do. I used to create the CD in this example, but you can adapt these instructions to any CD-burning program. Follow these six steps to make the CD bootable: • Download and install ISO Buster.
Insert the regular Server 2003 CD into your CD drive and load ISO Buster. • Expand the CD drive in ISO Buster until you see a floppy disk icon with the Bootable CD label.
Click on the bootable CD in the left pane, and in the right pane of ISO Buster you will see a file called Microsoft Corporation.img, which is the boot image file for the CD. Right click on the.img file and select Extract BootImage.img. Remember the location where you save this file; then close ISO Buster. • Open your CD-burning program. Using Roxio Easy CD Creator, click File/New CD Project/Bootable CD. A screen will pop up: Choose Type of Bootable CD. There are a few settings you need to know about on this screen.
Use this file to make as many masks as you like for yourself but please don’t share or steal the masks or templates - there was a lot of work involved in creating them. If you want to use them for any other reason then please get in touch. Build your own Low-Poly animal masks using templates designed by Steve Wintercroft. Our masks are great for Halloween, fancy dress and even weddings. How to Mask PDF Text Easily and Quickly. You can create PDF file easily from various document and image files or convert PDF to Office document, images, webpages etc; Split larger documents into smaller ones for easy retrieval later on and merge different documents into a single PDF file too; Password protect PDFs. Wintercraft mask pdf files. How to “mask” certain text in a PDF document. Ask Question 0. Proper MIME media type for PDF files. Convert HTML + CSS to PDF with PHP? How to mask sensitive information in a pdf file? I have a pdf file and want to mask some sensitive information in it such as social security numbers.
The Bootable CD Type: No Emulation; Load segment: 0x7c0; and the sector count should be set at 4. On the bottom of this screen, browse to where you stored that boot image file, import it and click OK. • You should see two.bin files in the CD project files window. Use the drop-down menu at the top left to select the folder where you stored the file structure -- created from the first article in this series -- and add all of those files into the CD project. • Customize the CD Project Properties. Click on File/CD Project Properties. The most important action on this screen is setting the File System type to Joliet.
If you leave it at ISO9660, you will have to rename a lot of files, and the CD probably won't work right in the end. Add whatever File System information you want on the second tab and then continue to the File Types tab.